-
20. Putting your code in the right place: a brief introduction to prg banking
21. Giving your main character a sword
22. Adding more features to the pause menu
23. Adding a second map
24. Saving the Game
25. Adding objects that attract or repel the player
26. Adding an enemy that mimics player behavior
27. Adding a new sprite size
-
40. Understanding and tweaking the build tools
41. Dealing with limited ROM space
42. Resizing your rom
43. ROM Data Map
44. Expanding available graphics using CHR banking
45. Getting finer control over graphics with chr ram
46. Writing Functions in Assembly
47. Automatic builds with GH Actions
48. Switching to unrom 512 for advanced features
Adding features to the pause menu
The pause menu in our game is very simple right now - it just shows the text “Pause” and nothing else. Some games have more features, such as restarting the level, or even quitting the game. This chapter details how we can add those things.
The code for this branch lives in the section3_pause_improvements branch.
You can also try the rom by downloading it from here.

Getting started: finding and modifying the existing code
The code for the existing pause menu lives in source/c/menus/pause.c - it’s actually quite simple right now, and
consists of two methods: a draw_pause_screen() method that draws the tiles to the screen, and a
handle_pause_input() method that simply waits for the user to press start.
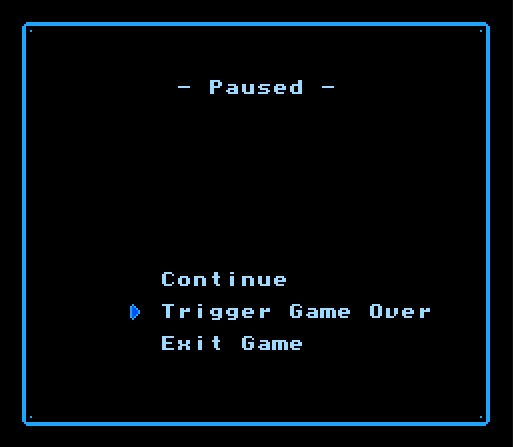
Let’s start by updating the graphics - we want to add a few menu items here that will let us do the following:
- Continue (Same as pressing Start now)
- Trigger Game Over
- Exit Game
You can come up with your own menu items of course, but these should help us demonstrate. First, let’s move
the current “Paused” text up a little bit. In the draw_pause_screen() method, find this line:
put_str(NTADR_A(11, 13), "- Paused -");
The put_str method writes a string to the screen using the address provided as the first parameter. This parameter
is picked using NTADR_A(X, Y), which gets the address of the 8x8 tile at the given position. The screen is
32 tiles wide and 30 tiles high, and our text is 10 tiles/characters wide, so NTADR_A(11, 13) puts us somewhere
around the middle.
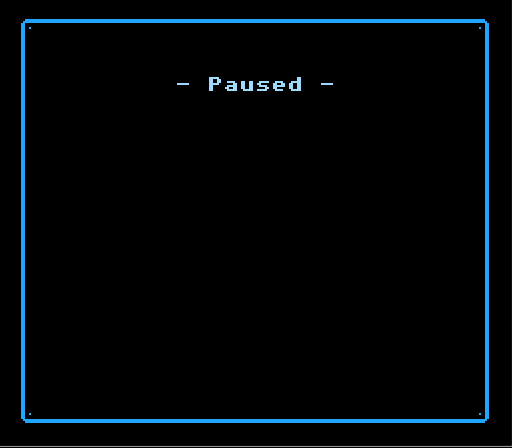
If we are going to have a menu, we probably want this text up in the top half of the screen. Let’s move it up a little
bit to NTADR_A(11, 6). If you rebuild the game, the pause text should have moved:
Adding some menu items
Next, we’ll add some menu items. We know that NTADR_A(11, 13) was about halfway down, so let’s skip a few lines
further then start. We’ll also shift to the left a little because our text is longer. Something like
NTADR_A(10, 18). Finally, we’ll skip a line between each row to make it more readable. Add three new lines
below this to draw the menu items:
put_str(NTADR_A(10, 18), "Continue");
put_str(NTADR_A(10, 20), "Trigger Game Over");
put_str(NTADR_A(10, 22), "Exit Game");
Re-run the game again to see the new text. If you don’t like the positioning, play around with the values
in NTADR_A() until you are. If you decide not to skip rows, you will have to change the logic below as well.
Selecting an Item
Now that we have menu items, we need a way to select them! Right now it’s really unclear to the player which item
is selected. If they hit Start or A, will they go back to the game? Game Over? Reset the game? We need a way
to show which item is selected. This could be done with a sprite with a little bit of effort, but we’re going to
opt to do it with another tile. (We hide all sprites on the screen to show this menu, so we don’t have to relocate/
redraw them.)
For this, we’ll need to work on the handle_pause_input() method a bit. Right now it calls a helper method called
wait_for_start() to wait for the start button to be pressed. That has the right idea, but we need to add a lot
of new logic to it. If we open source/c/menus/input_helpers.c we can see the full wait_for_start() method -
let’s grab all that code, copy it into our handle_pause_input() method, and start hacking on it to do what
we need. Replace your handle_pause_input() code with this, to start:
void handle_pause_input(void) {
    while (1) {
        lastControllerState = controllerState;
        controllerState = pad_poll(0);

        // If Start is pressed now, and was not pressed before...
        if (controllerState & PAD_START && !(lastControllerState & PAD_START)) {
            break;
        }
        ppu_wait_nmi();
    }

    // This is from our existing code, not `wait_for_start()` - don't forget it!
    gameState = GAME_STATE_RUNNING;
}
This method runs a while loop that looks to see if PAD_START has been pressed once per frame. Just like what was
done in the helper method. We want to do two more things though:
- Track which menu option is selected
- Draw an arrow over the selected item
Let’s add a temporary variable for this file, by adding #define currentMenuItem tempChar1 to the top of the file. We
will use this to track which option is selected in the menu, then use that to draw the arrow in the right spot. First,
we’ll set it to 0 before we enter the while loop - this will be our initial position. We’ll let 0 = continue, 1
= game over, and 2 = exit.
Next, we can update the loop to look at controllerState to see if this button has been pressed, then change this
value if it has. We do this by checking if the bit representing our button is pressed (in controllerState) and was
not pressed last time we checked (in lastControllerState). If we don’t include this check, transitions between
menu items will be extremely fast and hard to control. Here’s what that code might look like:
// If Start is pressed now, and was not pressed before...
if (controllerState & PAD_START && !(lastControllerState & PAD_START)) {
    break;
}

if (controllerState & PAD_UP && !(lastControllerState & PAD_UP)) {
    if (currentMenuItem != 0) {
        --currentMenuItem;
    }
}

if (controllerState & PAD_DOWN && !(lastControllerState & PAD_DOWN)) {
    if (currentMenuItem != 2) {
        ++currentMenuItem;
    }
}
Worth noting, we left the existing PAD_START logic in there. In this case, we want the Start button to always unpause
the game, instead of doing something else. Later we will trigger our actions with the A button.
Showing the selected item
This should work, but we can’t really see it right now since we don’t have any indicator on the screen! Let’s fix that. We can’t do things the way we did above, as that only works when the screen is off. Instead, we need to do some trickery to update the screen 1x/frame. We will opt to draw things in a vertical (up-and-down) line, meaning we only need to update 5 tiles. (Including the two blank ones)
First, we need to figure out what tile we’ll use for this. There is an arrow tile at 0xe2 in graphics/ascii.chr, so
we’ll use that. We also have to have a blank tile to use. Add these to source/c/menus/pause.h:
// The tile to draw for the selected menu item.
#define MENU_ARROW_TILE 0xe2
// The tile to show for empty space (ascii tiles are 32 bytes off, so we have to remove that here)
#define MENU_BLANK_TILE ' ' - 0x20
Next we need to add two things: some logic we’ll run once to create an array of values to update the screen with, and some logic to modify this array in case our array changes. We’ll start with the setup logic - put this before the while loop is started:
void handle_pause_input(void) {
    currentMenuItem = 0;

    // Fill screenBuffer with the information required to update the menu every tile - we'll then edit this
    // array in-line each frame.
    i = 0;
    screenBuffer[i++] = MSB(NTADR_A(8, 18)) | NT_UPD_VERT;
    screenBuffer[i++] = LSB(NTADR_A(8, 18));
    screenBuffer[i++] = 6; // Number of tiles to draw
    screenBuffer[i++] = MENU_ARROW_TILE;
    for (; i != 9; ++i) {
        screenBuffer[i] = MENU_BLANK_TILE;
    }
    screenBuffer[i] = NT_UPD_EOF;

    set_vram_update(screenBuffer);

    while (1) {
That’s most of it; we put the arrow in the first position, then leave white space for the rest. Now we just need
to update it and draw it. Remember that we are drawing a vertical line on the screen - so we are drawing one tile
on top of another. The first one will be lined up with “Continue”, the second is a blank line, the third lines up with
“Game Over”, etc. Add the following to the bottom of the while loop, just before ppu_wait_nmi():
screenBuffer[3] = (currentMenuItem == 0 ? MENU_ARROW_TILE : MENU_BLANK_TILE);
screenBuffer[5] = (currentMenuItem == 1 ? MENU_ARROW_TILE : MENU_BLANK_TILE);
screenBuffer[7] = (currentMenuItem == 2 ? MENU_ARROW_TILE : MENU_BLANK_TILE);

ppu_wait_nmi();
If the ternary (condition ? y : z) syntax is unfamiliar to you, it is basically a really compact in-line if
statement. It means if condition is true, use the value y, otherwise use the value z. In our case we use it to
set our buffer to MENU_TILE_ARROW if this menu item is selected.
Finally, we want to make sure we don’t keep updating the screen once we’re done, so add this as the last line after setting gameState:
    gameState = GAME_STATE_RUNNING;
    set_vram_update(NULL);
}
If you start the game up now, you should see the menu with selectable items. The arrow keys will let you switch between them! All that’s left is to make them do something.
Doing something when the user presses A
We’ve almost made it - now we just need to do something when items are selected. Two of these items are very simple,
and one will require a little knowledge about how the game works. We’ll basically want to check if A was pressed,
then figure out which value currentMenuItem is set to, and do that option. Here’s some of the code for that:
if (controllerState & PAD_A && !(lastControllerState & PAD_A)) {
    if (currentMenuItem == 0) { // Resume game by exiting the game loop.
        break;
    } else if (currentMenuItem == 1) { // Game over!

        gameState = GAME_STATE_GAME_OVER;

        // We have to skip the rest of the function so we don't reset gameState.
        // Do the vram update so we don't forget.
        set_vram_update(NULL);
        return;
    } else if (currentMenuItem == 2) { // Reset game

        // This function resets the entire game; use it with extreme caution.
        // No code past this function call will run.
        reset();
    }
}
Put this with our other controller checks, then that should be it! You now have a working pause menu. To note, the “Game Over” functionality is a little flaky - the sounds will be missing (due to where that code lives) but you can see the menu. You can use this to make the menu do whatever you want for your game!