-
20. Putting your code in the right place: a brief introduction to prg banking
21. Giving your main character a sword
22. Adding more features to the pause menu
23. Adding a second map
24. Saving the Game
25. Adding objects that attract or repel the player
26. Adding an enemy that mimics player behavior
27. Adding a new sprite size
-
40. Understanding and tweaking the build tools
41. Dealing with limited ROM space
42. Resizing your rom
43. ROM Data Map
44. Expanding available graphics using CHR banking
45. Getting finer control over graphics with chr ram
46. Writing Functions in Assembly
47. Automatic builds with GH Actions
48. Switching to unrom 512 for advanced features
Changing the World
Changing the map is one of the simplest changes we can make. The game works off of a 8x8 room grid, which themselves are made up of 16x12 tile rooms. These can be edited graphically using Tiled, which you should have installed in chapter 1.
To start, open Tiled, then select Open from the file menu, and find levels/game.tiled-project. You should see
a screen like this:
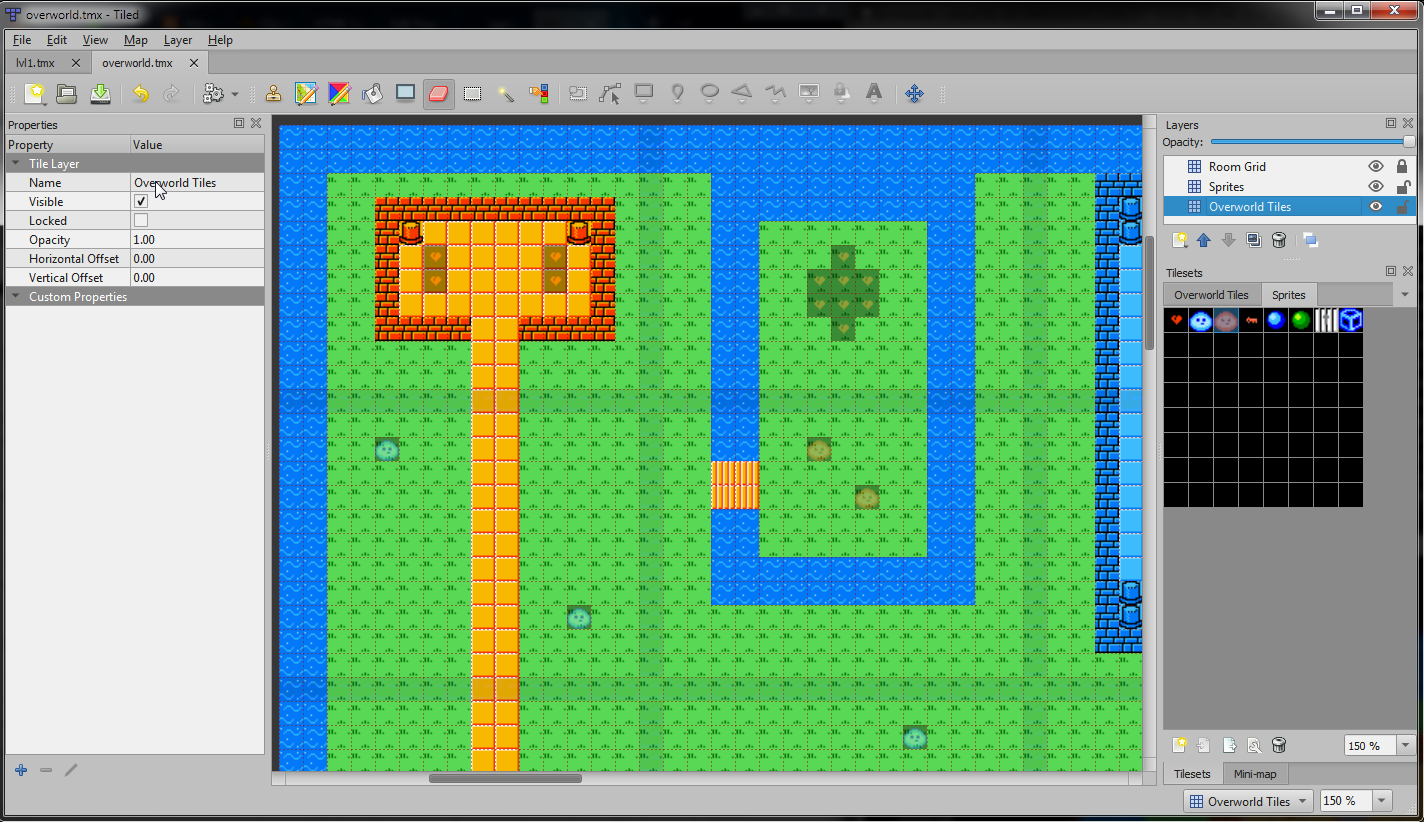
The panel in the middle is your world. The panel on the top-right is a list of layers, and the bottom-right has a set of your tiles to put on the map. The properties panel on the left can ignored or closed.
Important Note
The first thing to be aware of is which layer you have selected on the top right. If you want to edit the map,
be sure to select Overworld Tiles. You have to pair this with tiles from the Overworld Tiles tileset on the
bottom right panel. If you want to change sprites, you want to use the Sprites layer, and the Sprites tileset.
It can be hard to tell which layer you are on - turning on the “Highlight current layer” option in the “View” menu can help.
If you mix these two, the compiler will fail when it tries to build your levels.
The engine doesn’t handle empty tiles, so it is suggested that you avoid leaving any gaps in the Overworld Tiles
part of the map. Any blank spaces will be filled in with the very first tile in your tile list.
Beyond that, just make the rooms look like you want them to, then save the tmx file and build your game. Bam! level designs updated!
Tiled extension
I have developed a Tiled extension to make editing maps a bit easier. Its main function is to tell you when you mix up the tile and sprite layers. It does this by showing a little warning in the lower left when you save:

Clicking on it will show you details, and let you double click to have the editor try to auto-fix the problem:
 .
.
Finally, this adds an option to the Map menu (and the shortcut ctrl+shift+k) to automatically fix any of
these errors.
This extension is installed in the levels/tiled-extensions/ folder, which will be
automatically loaded with the project. You can disable it in settings, or just delete
it if you don’t want this functionality.
Sprite limit
By default, you can put a maximum of 8 sprites on a single map tile. If you add more than this, the last few will be skipped, and your build command will output warnings. Try to keep this limit in mind while adding to your map!
Can I change the size of the map?
Unfortunately, right now the size of the map is fixed at 128x96 tiles. If you want to change this, you would have to change a few pieces of code in map.c, as well as some of the logic in the map conversion tool tmx2c. This is a rather advanced topic, and there is no guide on how to go about this yet.
If you want a smaller map, your easiest solution is to build your map within the 128x96 tile grid. If you want something smaller, you can always fill the extra space with blank tiles. Alternatively, you can create one map with multiple sub-maps within it. This is the approach the original Legend of Zelda took. (See the “Dungeons (unified)” map on this page.
The room grid
There is also a layer called Room Grid - this layer just has the faint outlines that separates the rooms. This
layer is locked, so you can’t accidentally place tiles/sprites on it. (To unlock it, just push the lock icon in
the layers section.) The grid lines appear on the bottom and right of each room. This layer is ignored when
creating the rom.