-
20. Putting your code in the right place: a brief introduction to prg banking
21. Giving your main character a sword
22. Adding more features to the pause menu
23. Adding a second map
24. Saving the Game
25. Adding objects that attract or repel the player
26. Adding an enemy that mimics player behavior
27. Adding a new sprite size
-
40. Understanding and tweaking the build tools
41. Dealing with limited ROM space
42. Resizing your rom
43. ROM Data Map
44. Expanding available graphics using CHR banking
45. Getting finer control over graphics with chr ram
46. Writing Functions in Assembly
47. Automatic builds with GH Actions
48. Switching to unrom 512 for advanced features
Changing the Music
One of the signature things about the NES was the way it sounded. The NES was one of the first consoles that could really produce music when games were playing. We of course can do this with our engine, so let’s dive in.
Composing music
All music should be composed using a program called Famitracker, you may have installed as part of chapter 1. If not, go get it from the Famitracker website.
![]()
Famitracker is a somewhat daunting looking program, but it’s not all that scary. That said, creating music is a complex subject, and out of the scope of this tutorial. There is a fantastic tutorial available from Ben Burnes, which I suggest starting with if you’re new.
If you open the example music provided with the library, don’t be overwhelmed by the complexity of those songs. You can create something much more simple to start - the tutorial is a good start, and you can find many more examples online. (If you decide to use one for your game, be sure to get the author’s permission!)
Music for your game can be saved into sound/music.ftm - this is where we keep the music for the example
game.
A few things you should know specific to this engine:
- Expansion audio is not supported (It requires a different mapper, hardware, and more)
- DCPM support is possible, but requires additional rom setup not currently covered in this guide
- Sound effects also need to play during your game! They usually interrupt one of the two pulse channels (the example uses pulse 2) so keep that in mind when making music.
- This library does not limit what effects or notes you can use; have fun!
Importing music into the game engine
Once you have a song you like in famitracker, getting it into your game is a simple process. It is important to note that this process is manual - so you have to remember to do this any time you want your game’s music to update.
You’re likely already editing sound/music.ftm in famitracker - we need to save this into a format
our game recognizes, as it does not understand .ftm files. In the famitracker ui, go to the File menu,
and choose Create nsf... You should see a screen like this:
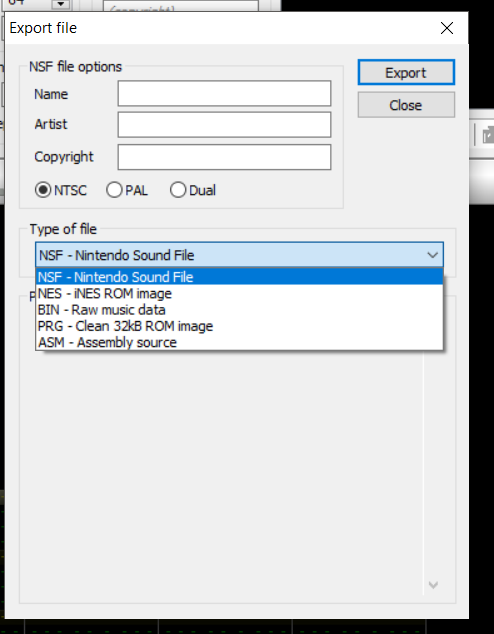
From the dropdown, select “BIN - Raw music data”. You can also enter some information about your game on this
screen. Next, hit “Export” and you will get a file save dialog. Save this file as sound/music.bin.
That should be all there is to it. If you rebuild your game, it should have your new music available. If you replaced one of the two built-in songs, you will be able to hear it immediately. If not, read on…
Playing custom songs
So, you have a new song you created, and you want to play it in the game. Great! We need a way to start
playing your new song though. Thankfully, famitracker gives us a clean way to do so. To keep it simple,
we will let you change songs by pressing the A and B buttons on the controller. You could put this
logic anywhere though.
First, we need to tell the engine how to find our new song. Songs are currently defined in
source/c/configuration/system_constants.h. Look for some definitions like this:
// Constants for songs we play in the game
#define SONG_TITLE 0
#define SONG_OVERWORLD 1
Each song in the Famitracker song list should have an entry here. If you added a new song at the end, it
will be number 2. Add a new define for this new song. (Note: if you are following along but have not added
a new song, you can define SONG_MY_NEW_SONG as 0 to reuse the title song.)
#define SONG_MY_NEW_SONG 2
Now, we just have to use it somewhere. We decided we want to change songs on input. We read player input once
per frame. The code that does this lives with the player sprite code in source/c/sprites/player.c. If you find
the prepare_player_movement() method, you can see the code that does this.
void prepare_player_movement(void) {
    // Using a variable, so we can change the velocity based on pressing a button, having a special item,
    // or whatever you like!
    int maxVelocity = PLAYER_MAX_VELOCITY;
    lastControllerState = controllerState;
    controllerState = pad_poll(0);

    // If Start is pressed now, and was not pressed before...
    if (controllerState & PAD_START && !(lastControllerState & PAD_START)) {
        gameState = GAME_STATE_PAUSED;
        return;
    }
The part we care about is the part after // If Start is pressed.... The logic there checks if the start
button is pressed, and was not pressed last time we chekd. We want to do something similar with the A
and B buttons.
Create a couple new if statements for the A and B buttons using PAD_A and PAD_B, like so:
if (controllerState & PAD_A && !(lastControllerState & PAD_A)) {
    // A button pressed
}
if (controllerState & PAD_B && !(lastControllerState & PAD_B)) {
    // B button pressed
}
Okay, these will now run whenever we press one of those buttons. Now, we just need to play music. This
can be done via the music_play(song_id); method. It uses the same id we put into the constants file.
Your code should now look like this:
if (controllerState & PAD_A && !(lastControllerState & PAD_A)) {
    music_play(SONG_OVERWORLD);
}
if (controllerState & PAD_B && !(lastControllerState & PAD_B)) {
    music_play(SONG_MY_NEW_SONG);
}
If you build your game and play it, the A and B buttons should switch between the overworld music and your new song!
Other music functions
There are a couple other music methods that are worth knowing about:
music_stop()
This method stops all playing music. You have to call music_play() again to start it back up.
music_pause(isPaused)
This method pauses your music or resumes it, based on the value passed in. If you pass in 1,
the music will be paused. If you pass in 0, the music will resume where you left off when you
called music_pause last.