-
20. Putting your code in the right place: a brief introduction to prg banking
21. Giving your main character a sword
22. Adding more features to the pause menu
23. Adding a second map
24. Saving the Game
25. Adding objects that attract or repel the player
26. Adding an enemy that mimics player behavior
27. Adding a new sprite size
-
40. Understanding and tweaking the build tools
41. Dealing with limited ROM space
42. Resizing your rom
43. ROM Data Map
44. Expanding available graphics using CHR banking
45. Getting finer control over graphics with chr ram
46. Writing Functions in Assembly
47. Automatic builds with GH Actions
48. Switching to unrom 512 for advanced features
Things to know about the NES and C
Okay, so you’ve (hopefully) programmed in C, or some other C-like language before. (If that statement isn’t true, don’t be too scared! There is a really good C tutorial linked from the main readme file; go try that out and come back once you feel more comfortable.) There are a few details about the console that will help you along, as well as a few C language features you won’t see often elsewhere.
This may not all make sense right away; that’s fine! Just be sure to come back here when you encounter some of these things, and read up as needed.
On bytes, bits, and Hexidecimal numbers
On the NES (and most computers), everything is stored in one or more things called
bytes. A byte is a number between 0 and 255, and can represent anything from a health
value, to a single letter in a name. A char (or unsigned char) takes up this
much space. Larger things (like ints) are made up of multiple bytes.
The numbers between 0 and 255 are typically represented by numbers between 0 and 9, put together to form bigger numbers. You count them like this:
0 1 2 3 4 5 6 7 8 9 10 11 12 13 14 15 16 17 18 19 20
Hexidecimal is another way to represent those numbers, that is closer to how a
computer uses them. A number of our tools use this format, and we also use
it in the code quite often as a result. In hexidecimal, rather than a digit being
from 0-9, digits go from 0-f. Each digit can be one of sixteen values, and represents
half a byte. In C, hexidecimal numbers are prefixed with 0x. (For example,
0x10 in hexidecimal is 16 in regular base-10 digits.)
Counting the same numbers (0-20, or 0x00 to 0x14) in hexidecimal looks like this:
0x00 0x01 0x02 0x03 0x04 0x05 0x06 0x07 0x08 0x09 0x0a 0x0b 0x0c 0x0d 0x0e 0x0f 0x10
0x11 0x12 0x13 0x14
You can also represent larger numbers in hexidecimal. For example, the integer value
of 256 can be represented as 0x100 and 1024 can be repesented as 0x400.
Why do we care about these numbers, though? The answer is faster code, and also a better
understanding of the underlying system. To survive writing code for the NES, you will have
to have a basic understanding of this. Every number we store actually stored as a pattern of
bits. A bit is a single point of data - it can be set to 0 or 1.
A byte like we described above is actually 8 bits put together. Understanding this lets you do magic tricks with numbers to make math much faster and easier.
Follow this tutorial if you haven’t encountered binary numbers before. Think about how you could change the binary numbers if you shifted all of the binary digits over by one. This will be useful in a few moments.
A quick introduction to bitwise operators
Now that we know how numbers are stored, we can start to think about how we can manipulate them quickly. For starters, think about how you might divide a number by hand. For example, let’s divide 12 by 4. Traditionally, you might do this:
unsigned char bigNumber = 12;
unsigned char result = bigNumber / 4; // This will contain 3
After this runs, result will contain 3 as you expect. Behind the scenes though, the console
might take 12 and subtract 4 3 times to figure that out. (Note: Technically, the compiler will optimize
this correctly so you do not have to in this simple case. It is not safe to rely on that though! This isn’t
as nice as the compilers you have for most modern systems.)
What if we could do this more quickly? Think about how these numbers are laid out in binary:
12 is actually equal to 0x0b in hex, or 00001100 in binary. Each digit in the binary is a power of two,
so if we simply shift the number over one digit, we get 00000110, or 6. If we do the same thing again,
we get 00000011, which is equal to 3! This only took two operations. This is called a bit shift, and C
makes them really easy! Here’s the same code again, but with shifting:
unsigned char bigNumber = 12;
unsigned char result = bigNumber >> 2; // This will contain 3.
This is admittedly a little hard to read, but can help save cycles. You won’t have to do this with all of your code, but if you are having problems with speed or space this will definitely help. Plus, the engine uses this kind of thing all over the place, so it is best to understand them.
This is only one of many tricks - check out this tutorial for a much better explanation!
There is very little RAM available
The NES has 2kb of ram available to it - period. That is not a typo; you can store at most 2048 unique one byte values in ram at once. (Technically there are ways to expand this with special NES cartridges; this is covered in an advanced chapter about SRAM.)
This results in us using some amount of trickery for storage - such as packing multiple
small values into a single byte, and using the unsigned char type everywhere. (It takes
up 1 byte. The int type takes up 2.) Note that constant (const) variables do not count
towards this total.
The zero page is a small amount of “special” ram
The NES has 256 bytes that can be accessed a little faster than the rest. This is called
the “zero page” - you will see us define a number of variables with ZEROPAGE_VAR - this
will create that variable in this space. This should be used for your most frequently-
accessed variables. The engine uses a lot of this space already, so choose carefully.
There is limited program space too
The NES has a very limited amount of space for your code - 32 kilobytes of code and data is visible at a time. Games can be bigger than this (the default rom in this engine reserves 128 kilobytes of space) but we have to do some tricks to make this work.
We do this by separating the code into multiple banks - these are 16 kilobyte sections
of code. The NES can have two of these banks loaded at once. The first 16 kilobyte bank
is always loaded (It is sometimes called the kernel, or the fixed bank) - we put all
of our most heavily used code in this.
There is also a second slot for a bank- this one can have any one of the other 7 banks loaded into it. We put most of our code (and other data, such as maps) into one of the other 7 banks, then call the function in a special way that knows how to access the correct bank.
To set which bank to put code into, we use the CODE_BANK() macro, with a number
placed into it. If this is used at the top of a code file, all code winds up in that
bank. To call code in a bank, we use the banked_call() method. There are a lot of
examples of this in source/main.c.
How to work within these system’s limitations
As the past couple headings demonstrated, the NES is very limited as a console.
As a result, you will also need to do some things that otherwise might be bad C practice, just to keep your game playable.
Here are some examples:
- Use global variables wherever possible
- Reuse the same variable for multiple things (Use
#defineto make things more readable) - Avoid using function parameters if a global variable could suffice
- Prefer separate arrays of bytes instead of arrays of structs
- Always use the
constkeyword when defining constant data - Prefer using
++ioveri++- the resulting code is smaller and faster - Be familiar with bitwise operators (such as
<<,>>,&and|) and use them often - Use bit shifting (
<<and>>) in place of multiplication and division whenever possible
If you are familiar with assembly, or think you can figure it out, every .c file is compiled
down to a .s assembly file in the temp/ directory during each build. The file is laid out
such that each line of C is entered as a comment, then all assembly code for that line is
included after. You can tweak your code and see what produces less instructions this way, if
you are so inclined.
How to debug/print log statements
The NES is a bit hard to work with due to its limitations, so this is tough. The browser or IDE you are reading this in likely used more RAM to display it than the NES has. There aren’t a lot of tools targetting the NES, either, so debugging is pretty difficult compared to modern systems.
There is no cout or console.log here, so what can we do?
The closest thing we have is a method called crash_error() which is included by source/menus/error.h. It will
crash the entire game, and print out any text you want alongside an optional variable. If you add this to your game,
you can see what was set at a certain time - it’s not much, but hopefully it helps.
Here’s an example:
crash_error("Got Here", "You got to this point in the code", NULL, NULL);
You can inject this in various places to see where you get to. You can also provide a variable as needed, like this:
crash_error("Crashed Bandicoot", "Got to the point in code where we use gameState", "GameState Value", gameState);
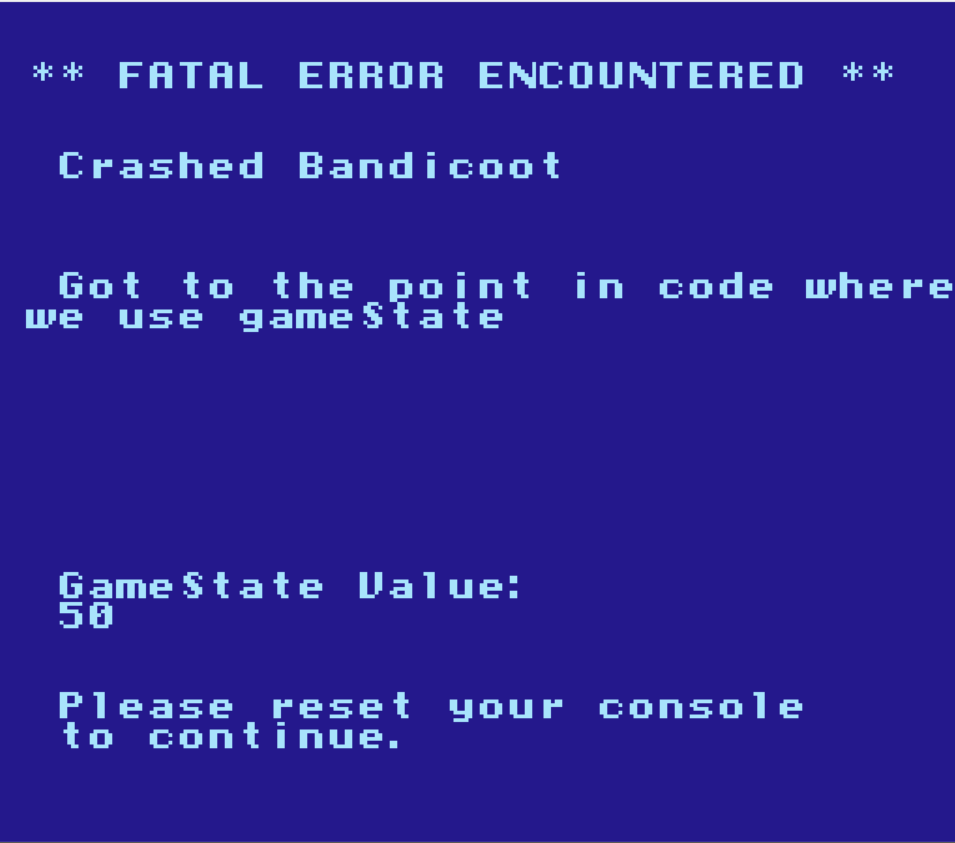
This error screen can help in situations where the game is acting strangly, and other tools are not helping enough.
Emulators also have debuggers for the NES, and using this project you’ll actually be able to see your C and assembly code directly in the emulator. Use this to your advantage!
Project layout
The project layout is hopefully somewhat simple, but I’ll reproduce it with a little extra detail here, in case it helps
- nes-starter-kit
|- .vscode                  Some project files and settings for Visual Studio Code users
|- config                   Configuration files for cl65, the NES linker we use
|- graphics                 Graphical assets for the game, in editable with nes screen tool (nesst)
|--- tiles.chr              Game tile assets, used on the map
|--- sprites.chr            Game sprite assets, used on the map
|--- ascii.chr              ASCII characters and such, used for the title screen and menus
|--- graphics.config.asm    Configuration to put graphics files into specific banks
|--- generated              Folder for images generated by nes-starter-kit. Used in Tiled
|--- palettes               Folder containing color palettes for the game
|----- palettes.config.asm  Configuration for palettes available to the game
|----- palettes.config.h    More configuration for palettes available to the game
|- guide                    This documentation ;)
|- levels                   Game levels, editable in Tiled.
|- rom                      The game in .nes format, passed to emulators
|- sound
|--- sfx                    Sound effects, in Famitracker/famitone2 format. All in one file
|--- music                  Music, in Famitracker format. The `.bin` file in here is loaded by
|                           nes-starter-kit. It can be exported from Famitracker.
|- source                   The C and assembly source for the game
|--- configuration          Constants and other things that don't have a better home
|--- generated              Code that is automatically generated. Generally safe to ignore
|--- graphics               Code around displaying and modifying graphics
|--- library                Tools built into nes-starter-kit to make life easier
|--- map                    Code and data used to display levels
|--- menus                  Menu code, and text-based screens (such as the credits)
|--- sprites                Code around showing/colliding with sprites (including the player's sprite)
|--- globals.c/.h           Global variables available for use anywhere
|--- main.c                 Starting point for the game's code, and the main game logic loop.
|--- neslib.h/asm           The code behind neslib, in assembly language. You can probably skip this at first
|- temp                     Intermediate assembly/object files go here. You can ignore this.
|- tools                    Lots of development tools/etc.
Feeling overwhelmed?
Don’t stress out if a lot of this doesn’t make sense yet - really, it’s ok. Just start exploring the other chapters and start tweaking the game, then come back here when you hit something strange. Try to keep the high-level details in mind, so you know when to look back.
The next chapter is a frequently asked questions guide. Skimming the question titles is probably a good idea, since there is a decent chance you will have one of those questions at some point soon.
Beyond that, skip on to section 2, and start building your game!