-
20. Putting your code in the right place: a brief introduction to prg banking
21. Giving your main character a sword
22. Adding more features to the pause menu
23. Adding a second map
24. Saving the Game
25. Adding objects that attract or repel the player
26. Adding an enemy that mimics player behavior
27. Adding a new sprite size
-
40. Understanding and tweaking the build tools
41. Dealing with limited ROM space
42. Resizing your rom
43. ROM Data Map
44. Expanding available graphics using CHR banking
45. Getting finer control over graphics with chr ram
46. Writing Functions in Assembly
47. Automatic builds with GH Actions
48. Switching to unrom 512 for advanced features
Adding new sprite sizes
By default, the game engine supports sprites that are 8px by 8px, or 16px by 16px. The engine is flexible to support other sizes with a bit of work, though! This chapter will help you create a sprite of a different size. Any multiple of 8px is possible, and sprites do not have to be square.
We’ll use a 24px by 8px snake sprite to test this out. The sprite is already in the codebase.
Please note that this is not the most wise size to use for sprites. Remember that the NES can handle a maximum of 8 hardware sprites on one horizontal screen line at a time. A 24 px by 8px snake can take up 3 hardware sprites in a row, so putting just 3 of these on the same row will cause flicker. That’s without thinking about the player sprites. The game will still work, but it may not look pretty if levels are not designed very carefully.
Additionally, the engine assumes game sprites will contain a maximum of 4 hardware sprites. If you want to
use more, you will need to change MAP_SPRITE_OAM_SHIFT and reduce the number of sprites you can show on
screen at once by reducing MAP_MAX_SPRITES. Doing this is beyond the scope of this chapter.
Follow along with this example in the git branch named section3_sprite_size.
If you want to try it yourself, download the ROM

Getting Started
The first thing we have to do is create a new sprite. We can do one like normal to start - it will be very broken, but we will at least be able to see the sprite. This will let us build the sprite in a few steps, and test along the way.
Let’s open source/c/sprites/sprite_definitions.c and add the following new sprite at the bottom of the array:
    SPRITE_TYPE_NPC, 0x00, SPRITE_SIZE_16PX_16PX | SPRITE_PALETTE_1, SPRITE_ANIMATION_NONE, SPRITE_MOVEMENT_NONE, 0x01, 14, 0x00,

    // New snake sprite, for editing
    SPRITE_TYPE_REGULAR_ENEMY, 0x08, SPRITE_SIZE_16PX_16PX | SPRITE_PALETTE_2, SPRITE_ANIMATION_FULL, SPRITE_MOVEMENT_RANDOM_WANDER, 0x01, 14, 0x01
Note that for now we’re creating it as a 16px by 16px sprite. We’ll change this in just a moment. After building the
game with create-nes-game build, you can add the sprite in using tiled.
The image will be messy looking in tiled - just imagine
that the created sprite takes up 3 blocks. (You can change this by updating the export tool in
sprite_def2img, but that is beyond the scope of this chapter.)
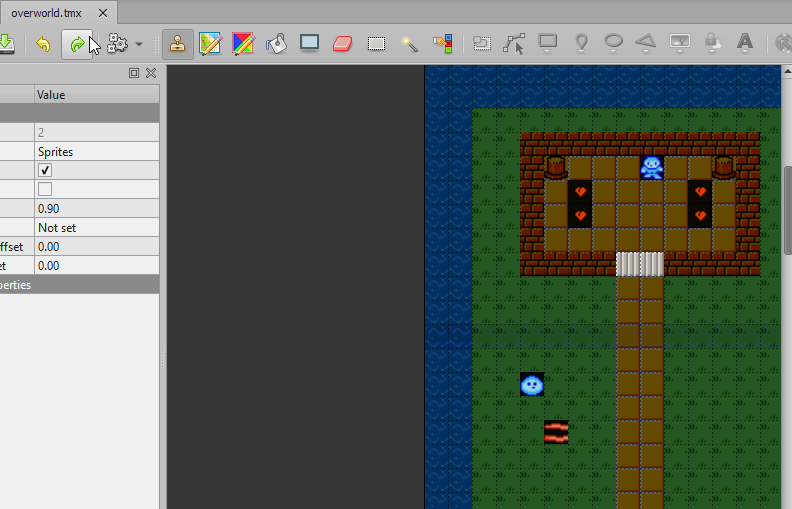
If you run the game, you should see the (currently very messed up) snake sprite. Okay, let’s get to it.
Updating the game’s code
Alright, you have some fancy graphics; how can we make them start working?
The first thing we need is a new sprite type. These are defined in source/c/sprites/sprite_definitions.h. Here’s
what it should look like:
// or to get the palette, you can use `theValue & SPRITE_PALETTE_MASK`
#define SPRITE_SIZE_MASK 0x3f
#define SPRITE_SIZE_8PX_8PX 0x00
#define SPRITE_SIZE_16PX_16PX 0x01
+ #define SPRITE_SIZE_24PX_8PX 0x02
Don’t forget to update source/c/sprites/sprite_definitions.c to use this new size.
After this, we’ll need to make a number of changes to source/c/sprites/map_sprites.c - this section will gloss over
some of the smaller details, so be sure to check the sprite_size git branch to find all of the details.
The first thing we need to do is update the update_map_sprites method to understand this new size. In order to do
this, we tweak the variables in this file to track width and height separately, as well as track the current sprite’s
“named” size. (SPRITE_SIZE_8PX_8PX, SPRITE_SIZE_8PX_24PX, etc)
The first thing that needs to change is the logic to define the sprite sizes. Here’s what that looks like:
if (currentSpriteSizeName == SPRITE_SIZE_8PX_8PX) {
    currentSpriteFullWidth = NES_SPRITE_WIDTH << PLAYER_POSITION_SHIFT;
    currentSpriteFullHeight = currentSpriteFullWidth;
} else if (currentSpriteSizeName == SPRITE_SIZE_16PX_16PX) {
    currentSpriteFullWidth = NES_SPRITE_WIDTH << (PLAYER_POSITION_SHIFT+1);
    currentSpriteFullHeight = currentSpriteFullWidth;

    // For 16x16 sprites, we reduce the sprite hitbox a bit. We also subtract this offset from X/y in-place
    currentSpriteFullTileCollisionWidth = currentSpriteFullWidth - (2*SPRITE_TILE_HITBOX_OFFSET);
    currentSpriteFullTileCollisionHeight = currentSpriteFullTileCollisionWidth;

} else if (currentSpriteSizeName == SPRITE_SIZE_24PX_8PX) {
    currentSpriteFullWidth = (NES_SPRITE_WIDTH*3) << PLAYER_POSITION_SHIFT;
    currentSpriteFullHeight = (NES_SPRITE_WIDTH) << PLAYER_POSITION_SHIFT;

    currentSpriteFullTileCollisionWidth = currentSpriteFullWidth - (3*SPRITE_TILE_HITBOX_OFFSET);
    currentSpriteFullTileCollisionHeight = currentSpriteFullHeight - (SPRITE_TILE_HITBOX_OFFSET);
}
We use these variables a bit later to react to size. For the sake of this tutorial, we will only be handling the
SPRITE_ANIMATION_FULL case. The other two should be fairly easy to infer.
Next, we need to figure out where the sprite starts. This is a bit more complicated than with square sprites, so we need to change around the logic quite a bit. Each section will have a section that looks like this, in place of the existing one-line logic that handles 8x8 and 16x16 sprites.
currentSpriteDirection = currentMapSpriteData[currentMapSpriteIndex + MAP_SPRITE_DATA_POS_CURRENT_DIRECTION];
if (currentSpriteDirection == SPRITE_DIRECTION_LEFT) {
    if (currentSpriteSizeName == SPRITE_SIZE_24PX_8PX) {
        currentSpriteTileId += 0x12;
    } else if (currentSpriteSizeName == SPRITE_SIZE_8PX_8PX) {
        currentSpriteTileId += 0x12;
    } else {
        currentSpriteTileId += 0x24;
    }
} else if // ...and so on for the other directions
The code above isn’t all that different than before in functionality, but we have to handle more sprite sizes,
so using the ternary operator (the ? character) would become very confusing.
Just below this collection of if statements used for animating sprites. We’ll have to update this too. With square sprites we can always add either 1 or 2 to the sprite’s id to do the animation. For 24px by 8px sprites though, we have to get a little bit more smart. The new code below is the section in the middle.
// Next, let's animate based on the current frame.
if (currentSpriteSizeName == SPRITE_SIZE_16PX_16PX) {
    currentSpriteTileId += (frameCount & 0x10) >> 3;
} else if (currentSpriteSizeName == SPRITE_SIZE_24PX_8PX) {
    if (currentSpriteDirection == SPRITE_DIRECTION_LEFT || currentSpriteDirection == SPRITE_DIRECTION_RIGHT) {
        currentSpriteTileId += ((frameCount & 0x08) >> 3)*3;
    } else {
        currentSpriteTileId += (frameCount & 0x08) >> 3;
    }
} else {
    currentSpriteTileId += (frameCount & 0x08) >> 3;
}
We have to separate out the left/right animation from the up/down animation, since they have variable width.
The (frameCount & 0x08) >> 3 is just a fancy way to get a 0 or 1 based on a timer. (0x08 in hex is
00001000 in binary, shifted right 3 times is 00000001. 0 Stays as 0, of course.) We have to multiply by
3 for left/right. (Note: Multiplying like this is generally best avoided! It’s inefficient, but we do not have
another easy option here.)
Finally, we need to draw the actual sprite. There are if/else statements for the existing sizes, so we can just add ours at the end. Here’s what that looks like:
} else if (currentSpriteSizeName == SPRITE_SIZE_24PX_8PX) {
    oam_spr(
        sprX8,
        sprY8,
        currentSpriteTileId,
        tempMapSpriteIndex,
        oamMapSpriteIndex
    );
    if (currentSpriteDirection == SPRITE_DIRECTION_LEFT || currentSpriteDirection == SPRITE_DIRECTION_RIGHT) {
        oam_spr(
            sprX8 + NES_SPRITE_WIDTH,
            sprY8,
            currentSpriteTileId + 1,
            tempMapSpriteIndex,
            oamMapSpriteIndex + 4
        );
        oam_spr(
            sprX8 + (NES_SPRITE_WIDTH*2),
            sprY8,
            currentSpriteTileId + 2,
            tempMapSpriteIndex,
            oamMapSpriteIndex + 8
        );
    } else {
        oam_spr(
            sprX8,
            sprY8 + NES_SPRITE_HEIGHT,
            currentSpriteTileId + 16,
            tempMapSpriteIndex,
            oamMapSpriteIndex + 4
        );
        oam_spr(
            sprX8,
            sprY8 + (NES_SPRITE_HEIGHT*2),
            currentSpriteTileId + 32,
            tempMapSpriteIndex,
            oamMapSpriteIndex + 8
        );
    }

    // Hide the last sprite, since we don't use it.
    oam_spr(
        SPRITE_OFFSCREEN,
        SPRITE_OFFSCREEN,
        SPRITE_OFFSCREEN,
        tempMapSpriteIndex,
        oamMapSpriteIndex + 12
    );
}
Of note, we draw the first and last sprites the same every time, but we have some custom logic for the second and third sprites depending on the direction of the sprite. If we’re facing up or down, we need to draw the sprites horizontally. (We also pick their positions in the same way.) Likewise, if facing left or right, things are a bit different.
That was a lot of work in one method, but that’s actually everything! You should now have a snake sprite that is a custom size. Enjoy!