-
20. Putting your code in the right place: a brief introduction to prg banking
21. Giving your main character a sword
22. Adding more features to the pause menu
23. Adding a second map
24. Saving the Game
25. Adding objects that attract or repel the player
26. Adding an enemy that mimics player behavior
27. Adding a new sprite size
-
40. Understanding and tweaking the build tools
41. Dealing with limited ROM space
42. Resizing your rom
43. ROM Data Map
44. Expanding available graphics using CHR banking
45. Getting finer control over graphics with chr ram
46. Writing Functions in Assembly
47. Automatic builds with GH Actions
48. Switching to unrom 512 for advanced features
Adding a Second Map
Okay, you have a game, it mostly works, but what if you wanted to add a dungeon? Or houses? You might want another map to show them. This lets you have many more tiles. You can also combine this with another chapter to have different tiles on different maps, so you could make your dungeons/houses more believable.
This is going to be one of the longer chapters, but it should be quite worth it in the end. We need to cover a lot.
You can follow along in the git branch named section3_second_map.
If you want to see what it looks like, try the example rom.

Creating a new map
Let’s start with the fun part. You need a new map! Create a new copy of levels/overworld.tmx named something else
(I used levels/underworld.tmx, and change it around as much as you like, or just make it an entirely
new world. If you want to jump ahead a little, we will also be adding some house-like buildings later.
You should probably also add these to your project in tiled, though this isn’t strictly required. It just makes things easier for you.
Build changes
We also need to make some small adjustments to the build to start building this new map. We’ll copy what’s
already being done for the current map, and tweak it to what we need it to be. This is in the
beforeStepActions area in .create-nes-game.config.json. That currently looks like this:
    "beforeStepActions": {
        "build": [
            "tools/create-nes-game-tools/tmx2c 3 overworld levels/overworld.tmx source/c/generated/overworld"
        ]
    },
This is a little bit dense, but we can figure it out. Let’s start by understanding what tmx2c does. Run the program
with the --help parameter to find out. (Or just look at the output below)
$ ./tools/create-nes-game-tools/tmx2c.exe --help
[tmx2c]  [Sat, 11 Feb 2023 05:01:09 GMT]  tmx2c version 1.1.1
[tmx2c]  [Sat, 11 Feb 2023 05:01:09 GMT]  Usage: tmx2c [bank number] [variable name] [file to convert] [file to save output to]
[tmx2c]  [Sat, 11 Feb 2023 05:01:09 GMT]  Note that [bank number] must be a single hexadecimal digit, 0-F.
So at a basic level,
this is compiling the input file levels/overworld.tmx into PRG code bank 3 (Like doing CODE_BANK(3)
in C) using the level name overworld and storing it into
source/c/generated/overworld.
We need to keep doing this, but also add a new one to generate your new map. We need to put it into a
different empty PRG bank (these maps take up an entire code segment/PRG bank!) and use a different
name. For this example, we chose underworld and prg bank 5.
Here’s the end result:
    "beforeStepActions": {
        "build": [
            "tools/nes-starter-kit-tools/tmx2c 3 overworld levels/overworld.tmx source/c/generated/overworld",
            "tools/nes-starter-kit-tools/tmx2c 5 underworld levels/underworld.tmx source/c/generated/underworld"
        ]
    },
If you rebuild your game, it should build successfully, and you should see this new file be
included. (But, it won’t do anything yet. Soon!) You can also make a change to source/c/main.c
to change currentWorldId to start as the bank you used above (5 in the example. We’ll add
a constant for that soon!) and see your new world render. Now, we need to make the game do that
itself!
NOTE: The prg bank number here should be a single hexadecimal digit. After 9 comes A; 10 is not valid.
Case also matters; letters must be capitalized.
Adding a new “Warp Door” sprite
We now have a second world that we can visit, but we don’t have a way to get there yet. To do this, we can add a new sprite type that will trigger us to move to the new map. I chose to make that look like a door, and teleport the player to the door tile on that new map.
We’ve added a few sprites by now, so I am not going to detail everything; you are able to find all code in the git branch if you get stuck. The sprite definition ends up looking like this:
SPRITE_TYPE_WARP_DOOR, 0xce, SPRITE_SIZE_16PX_16PX | SPRITE_PALETTE_0, SPRITE_ANIMATION_NONE, SPRITE_MOVEMENT_NONE, 0x00, 0x00, 0x00
SPRITE_TYPE_WARP_DOOR is the type we will look for, and 0xce is the index of a door sprite
in our chr file. Once you have this sprite added, go ahead and add it to both places. I opted
to make it look like a door to a little building:
Now, we just need to add some logic for it. This won’t work without some additional code in the next section, so don’t fret if it won’t compile, and complains about map locations. I’m going to paste it in-line, then explain a few of the finer points in more detail.
case SPRITE_TYPE_WARP_DOOR:

    // First, hide the sprite. We want to physically keep it around though, so just update the tile ids.
    currentMapSpriteData[(currentMapSpriteIndex) + MAP_SPRITE_DATA_POS_TILE_ID] = SPRITE_TILE_ID_OFFSCREEN;

    // If we set a cooldown time, don't allow warping. This allows us to re-spawn the user into the doorway
    // in the other map without them immediately trying to teleport again.
    if (warpCooldownTime != 0) {
        break;
    }

    // Next, figure out if the player is completely within the tile, and if so, teleport them.
    // Note that this isn't a normal collision test, so don't try to reuse it as one ;)

    // Calculate position of this sprite...
    tempSpriteCollisionX = ((currentMapSpriteData[currentMapSpriteIndex + MAP_SPRITE_DATA_POS_X]) + ((currentMapSpriteData[currentMapSpriteIndex + MAP_SPRITE_DATA_POS_X + 1]) << 8));
    tempSpriteCollisionY = ((currentMapSpriteData[currentMapSpriteIndex + MAP_SPRITE_DATA_POS_Y]) + ((currentMapSpriteData[currentMapSpriteIndex + MAP_SPRITE_DATA_POS_Y + 1]) << 8));

    // Test to see if the sprite is completely contained within the boundaries of this sprite.
    // To make it a little loose, we make the sprite look like it is 2 pixels wider on all sides.
    // (subtract 2 from x and y positions for comparison, then add 2 to the width and height.)
    if (
        playerXPosition > tempSpriteCollisionX - (2 << PLAYER_POSITION_SHIFT) &&
        playerXPosition + PLAYER_WIDTH_EXTENDED < tempSpriteCollisionX + (18 << PLAYER_POSITION_SHIFT) &&
        playerYPosition > tempSpriteCollisionY - (2 << PLAYER_POSITION_SHIFT) &&
        playerYPosition + PLAYER_HEIGHT_EXTENDED < tempSpriteCollisionY + (18 << PLAYER_POSITION_SHIFT)
    ) {
        // Okay, we are going to warp the user!

        // Set our cooldown timer, so when the user shows up on the new map inside the door, they are not teleported.
        warpCooldownTime = DOOR_WARP_COOLDOWN_TIME;

        // Determine which world map to place the player on based on the current map.
        // NOTE: If you find yourself adding this logic somewhere else, consider putting it into a function.
        // Additionally, this will not scale to having many maps. You may have to add a second array of characters
        // and look up the world id like that.
        if (currentWorldId == WORLD_OVERWORLD) {
            // If you have more music, this would be a great place to switch!

            // Swap worlds
            currentWorldId = WORLD_UNDERWORLD;
            // Look up what world map tile to place the player on, from our big table, and switch to that tile.
            playerOverworldPosition = overworld_warp_locations[playerOverworldPosition];
        } else {
            // If you have more music, this would be a great place to switch!

            // Swap worlds
            currentWorldId = WORLD_OVERWORLD;
            // Look up what world map tile to place the player on, from our big table, and switch to that tile.
            playerOverworldPosition = underworld_warp_locations[playerOverworldPosition];

        }
        // Switch to a new gameState that tells our game to animate your transition into this new world.
        gameState = GAME_STATE_WORLD_TRANSITION;
    }
    break;
This is a lot of logic, but hopefully the in-line comments help clear things up. At a high level, it checks to
see if the player sprite is fully contained within the door, and if so, it changes the map that we load (this
logic lives in source/c/map/load_map.c) and places the player onto the correct map tile.
There is a cooldown timer in this which prevents the player from immediately teleporting a second time after
this teleport is complete. The value (set in source/c/sprites/sprite_definitions.h) is a couple seconds, which
should be long enough for a player to move, but short enough that it won’t block the player from entering another
nearby door. Tweak this number as you see fit.
Make sure you also add a snippet of code that ticks down this timer to the beginning of the
handle_player_sprite_collision method. Without this, the player will only ever be able to warp once. Here’s the
code:
if (warpCooldownTime != 0) {
    --warpCooldownTime;
}
This won’t quite work on its own yet, as we have not defined the values for overworld_warp_locations and
underworld_warp_locations. That’s up next.
Storing and accessing door locations
Okay, at this point we have some code that will warp you to a different world map, but how can we know which map screen/tile to put you on when you go to your new world map? Unfortunately, we don’t! Not with the tools we have written, anyway. There is no great way to store this information in your map with Tiled, so we had to go with a little bit of a more manual solution.
To find the location, we create an array with one byte per map screen/tile, then use this to look up which tile
to send you to. We do this based off a variable we refer to as playerOverworldPosition.
In our movement code, we keep track of a variable called playerOverworldPosition. This is the
map tile the player is currently on. If you move left or right a screen, we add/subtract 1 from this. The map is
8 tiles wide by 8 long, so moving up and down adds/subtracts 8. (See: source/c/sprites/player.c for code.) The
number thus can be 0-63.
The array mimics our map, such that we can use playerOverworldPosition as the index to our array of bytes. This
array is called overworld_warp_locations for our main world, and underworld_warp_locations for the new underworld
we added. These are created in source/c/map/levels/ - there are header and c files, as usual. Here is an example
from the source/c/map/levels/overworld_warp_locations.c:
// This array contains one entry for each map tile in our map. The one entry is the id of the map tile to teleport
// to, if a player walks through a teleport door. Ids go from left to right, start at   0, and there are 8 tiles per row.
const unsigned char overworld_warp_locations[] = {
      0,   0,   0,   0,   0,   0,   0,   0,
     17,   0,   0,   0,   0,   0,   0,   0,
      0,   0,   0,   0,   0,   0,   0,   0,
      0,   0,   0,   0,   0,   0,   0,   0,
      0,   0,   0,   0,   0,   0,   0,   0,
      0,   0,   0,   0,   0,   0,   0,   0,
      0,   0,   0,   0,   0,   0,   0,   0,
      0,   0,   0,   0,   0,   0,   0,   0
};
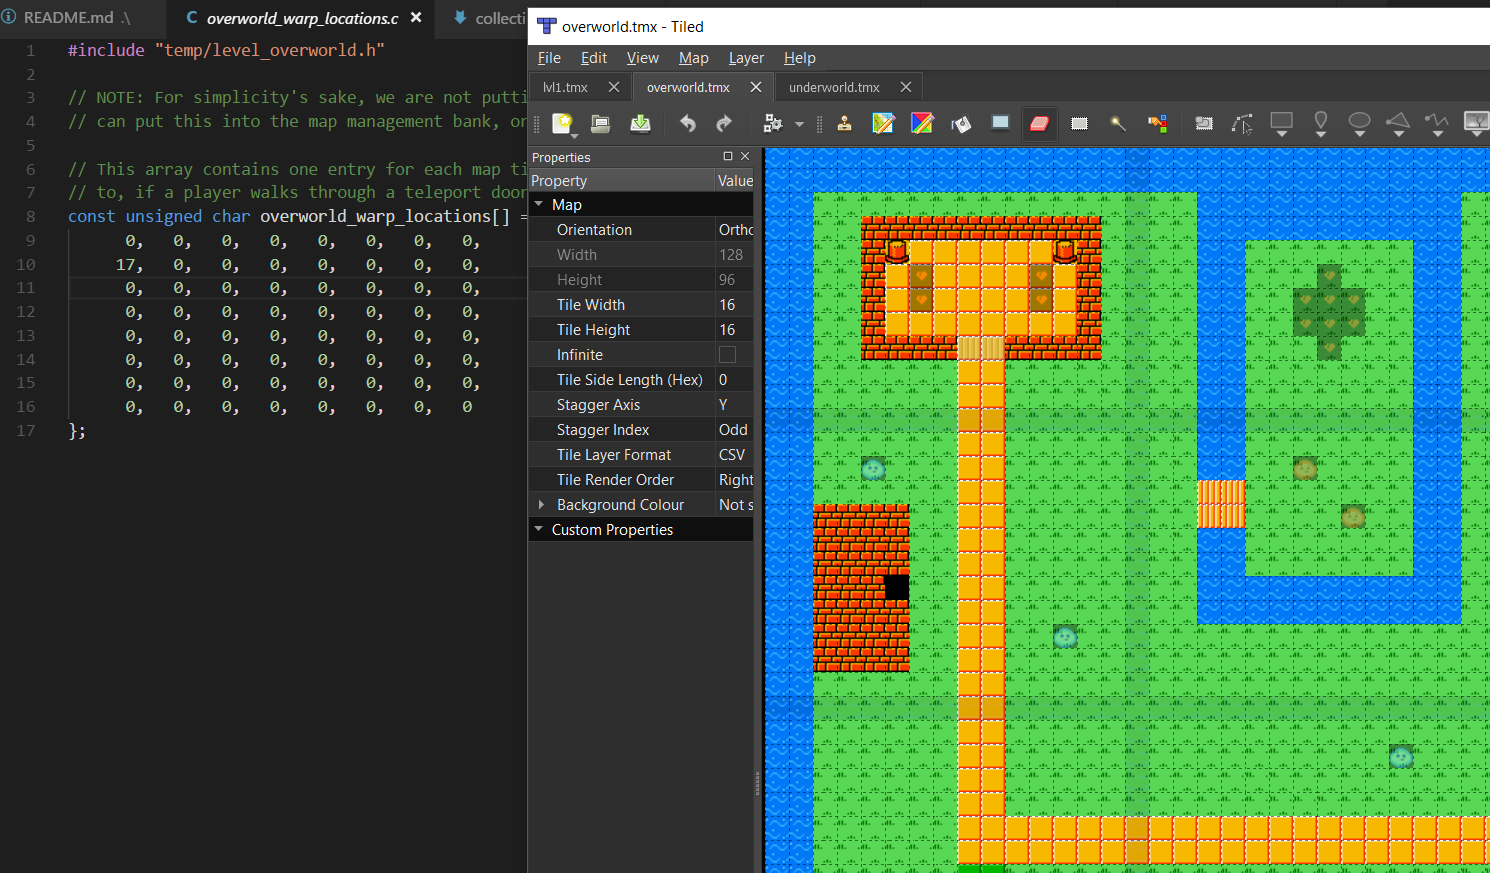
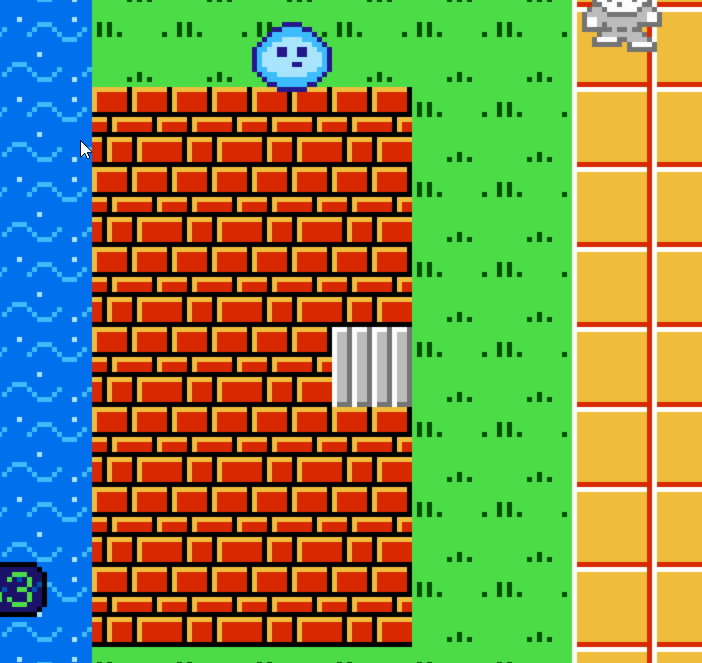
If you look at this next to tiled, each number lines up to one map tile on-screen. So, since our house is in the
first tile on the second row in Tiled, we have to update the first byte in the second row of this array. The value
we put here is the value we want to place into playerOverworldPosition. (In this case, 17, which is the building
on the 3rd row in the 2nd tile.)
We then create another file like this for the underworld map, which works the same way. The tile that has the door
on that map has to be updated to point back at our tile. (A value of 8 in our example.)
If this isn’t super clear, try changing the non-zero values in the arrays, and see what it does to your player position when you warp. (You will have to finish the code in the tutorial first.)
After this, your code will finally compile, but it will crash due to having an unknown gameState. This next step will be the last one; we’re almost there!
Adding a new game state for transitioning to a new world
At this point we have almost everything we need to move the player to a new screen, however we never actually wrote
any code to draw that new screen. Thankfully, we already have code capable of doing that drawing; we just have to
call it. We set a new gameState value called GAME_STATE_WORLD_TRANSITION, and our main loop needs some
modification to support it.
The change is actually pretty simple - we end up reusing almost the same logic as we use for
GAME_STATE_SCREEN_TRANSITION. We keep these separated so any logic to provide smooth screen scrolling is not
used. Here’s the new code:
case GAME_STATE_WORLD_TRANSITION:
    oam_hide_rest(FIRST_ENEMY_SPRITE_OAM_INDEX);
    banked_call(PRG_BANK_MAP_LOGIC, do_fade_screen_transition);
    break;
All this does is hide all sprites on the screen other than the player, then call a method that fades the screen
to black, then re-draws the map, and fades back in. The method also sets gameState back to GAME_STATE_RUNNING,
so there’s nothing else to do.
That was a long one, but that’s it! If you build your game and run it, walking into your new warping door should transfer you to your other map, then let you go back again!
Potential Enhancement: Supporting 3+ worlds
If you wanted more than two worlds, the code above would need some modification. There are many ways to do it, however if you’re a bit stumped here are a few simple options:
First, you could set the world number on the sprite_definition entry, and read it back from there. This would
allow you to have different sprite images to point to different worlds too, if you wanted to.
Second, the tile ids in overworld_warp_locations only span values from 0-63, leaving the top two bits open for
use. You could use these two bits to decide on a world.
A third simple option would be to have yet another array, something like overworld_warp_map_ids, which would
just contain a map number. This isn’t the most efficient use of prg, but it’s easy enough to understand. Any of
these will work.
Okay, you read the extra section, now you’re really done! Good job!